Are you planning for your next trip? Well! It would be great to look back at some of the spectacular places you visited last year. Thankfully, the iPhone has a very useful feature that records your location history! This tool is useful because it registers the places you have visited and the time you were there, thus enabling you to retrieve your most cherished memories. This feature is also useful in other situations, like when you need to locate a lost phone.
In this blog, I will explain how you can see the iPhone location history via built-in settings, Google Maps, and reliable a third-party online tool. So, let’s get started!
How to Check iPhone Location History via the Built-in Tool
If you want to check the iPhone location history, then a built-in locations tool can come in handy.
This feature can show you the spots you have been to. For example, to track the places you have been during a vacation, the places you spent during a business trip, or the places that you go frequently. It is best for personal use but is not set for larger-scale uses of tracking an iPhone and other things.
| Pros | Cons |
| + This built-in tool automatically saves the information on the phone system, preventing outside sharing of the data. + The feature is straightforward to use. | – It is limited to your device, meaning you cannot monitor the activities of other people. – It may potentially drain the battery if you leave it on throughout the day. |
Step-by-Step Guide on how to check location history on iPhone:
📝 Prerequisites:
- Your location services on your iPhone must be turned On.
- iPhone’s significant location feature must also be enabled.
Step 1. First, open the settings on your iPhone.
Step 2. Now, look for Privacy & Security > Location services.
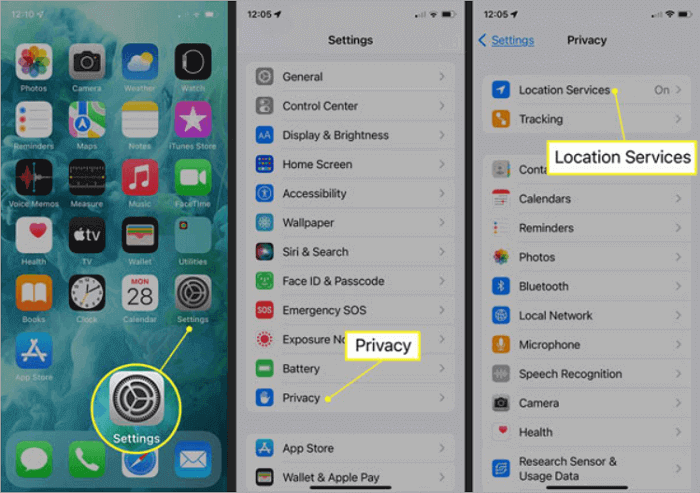
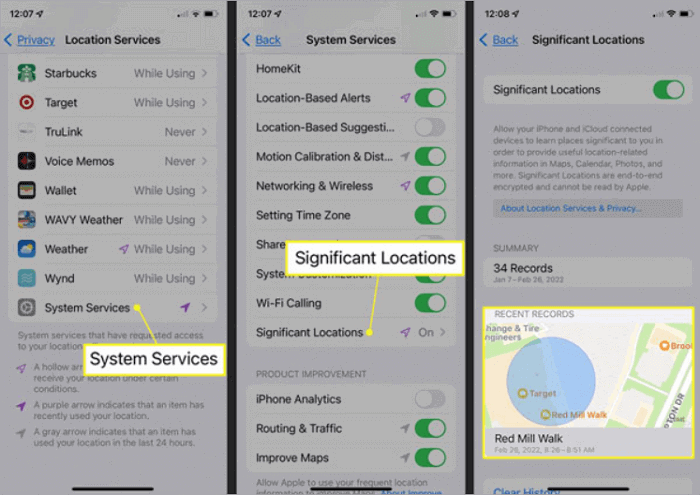
Step 3. Then, under the location services menu, go for System Services.
Step 4. To view location history on iPhone, locate the Significant Locations option ( or Frequent locations ) and click on it. As you scroll, you will find a number of places and dates presented in detail.
How to track iPhone Location History Using a Third-Party Tool
Hopefully, you have understood how to check the location history on your iPhone. Now, a question might pop into your mind: is it possible to track the iPhone location history of someone else? Well! The answer is yes. You can easily do this by using TrackMobi software.
TrackMobi is a third-party online service that enables you to view the location history of others, including your family members, locate lost mobile phones, and more.
Pros of TrackMobi Service:
✅ This tool is SSL encrypted, so you can track people without them knowing.
✅ You can easily see location history on iPhone, regardless of the mobile carrier and region.
✅ You can use this service online; there is no need to download the app.
✅ It’s available in most scenarios, even when you need to track a dead phone.
Its fast service makes it a beneficial tool in emergencies, with which you can easily track the location by entering the phone number. Moreover, you can use it as a family phone location tracking tool for keeping an eye on your kid’s whereabouts.
How to see the history of locations on iPhone using TrackMobi:
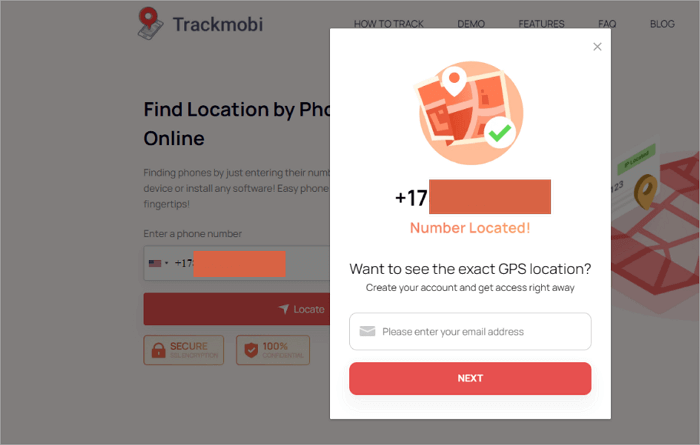
Step 1. First, go to TrackMobi’s official website and enter the phone number of the phone you want to locate.
Step 2. Then, you need to enter your email address to get the location details.
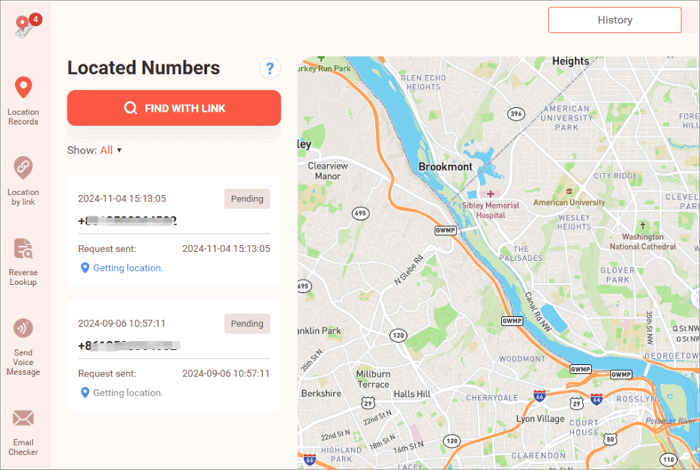
Step 3. Finally, log in to your TrackMobi account to get the location history of the phone number.
How to View iPhone Location History by Date on Google Maps
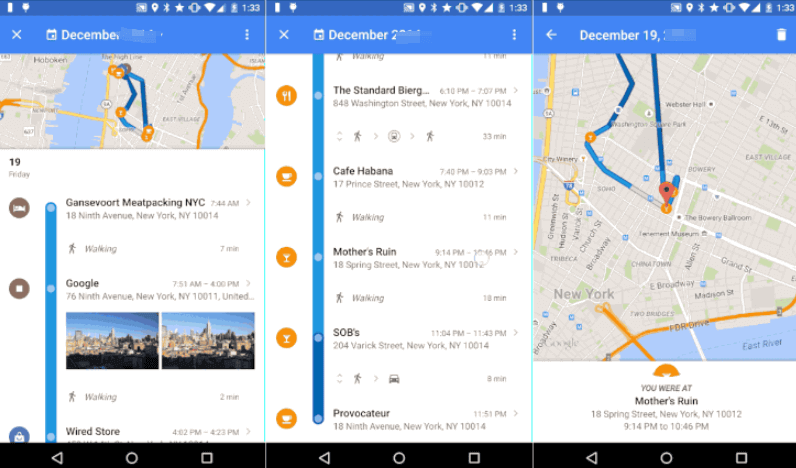
If you want to check your iPhone location history by date, then there is good news for you. Google Maps has an effective way to view this information. For instance, you can use the Timeline aspect of Google Maps to estimate your daily movements, allowing you to track your activities for that day.
| Pros | Cons |
| + The information is safely kept in your Google account, allowing you to check your timeline from your phone. + This feature helps you save a complete record of places you have been. + Google Maps has split time into intervals. So you can take advantage of this feature and track where you went on specific days. | – This feature is enabled only when you have enabled your location history tracking option on the respective device. – You need a Google account, and your data is linked to it, which can limit your options for local storage. |
Google Maps Timeline is ideal for those who want to track their iPhone location history, such as remembering travel routes, daily activities, or places visited on specific dates. It proves to be quite useful for users who wish to have neatly compiled movements and records of their whereabouts.
In addition to finding the location of an iPhone, Google Maps also enables you to track an Android phone using an iPhone with simple clicks.
How to view location history on iPhone using Google Maps:
📝 Prerequisites:
- You must have Google Maps installed on your iPhone.
- Don’t forget to enable the Google Maps timeline feature.
Step 1. First, open your Google Maps app on your iPhone > Saved Tabs.
Step 2. Under the saved tabs section, you need to tap on the Timeline option.
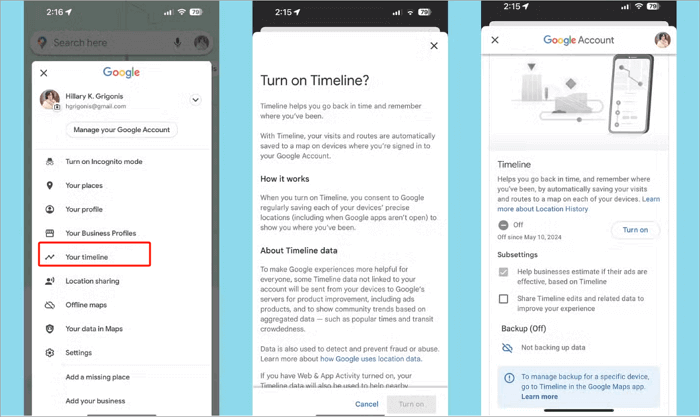
Step 3. Here, you need to go to the Today section, where you can view the location history iPhone. That’s it!
💭 Important Considerations:
Google Maps can track your location because that data is saved in your Google account. So, go through your privacy settings and see if you have any issues with Google tracking your location.
Moreover, though Google Maps is powerful for tracking GPS locations on phones, the position may sometimes be slightly off if the GPS signal is weak.
Conclusion
From the above discussion, we can say that as of 2024, finding iPhone location history is extremely simple! There is a built-in tool for tracking your old locations called Significant Locations within your settings. You can also access this through the map application on your phone.
If you need a little bit more in terms of tracking, you can also use third-party apps such as TrackMobi to view wherever you have traveled. The only caution that needs to be taken in mind while utilizing these services is to adjust the settings in such a way that your data remains safe.
FAQs on the History of Locations on iPhone
Are you curious about tracking your location history on your iPhone? Okay! Here, I’m trying to answer your queries related to tracking of history location. So, be with us!
How to manage the history of locations on iPhones?
Step 1. Go to Settings on your iPhone.
Step 2. Select Privacy & Security.
Step 3. Select Location Services.
Step 4. Scroll down and select System Services.
Step 5. Now, select Significant Locations, which allows you to view or erase your location history.
How to check iPhone location history on Mac?
Step 1. Go to your web browser and open Google Maps.
Step2. Link your iPhone Google account
Step 3. Click on three horizontal lines
Step 4. Select Your Timeline option. That’s it! Now, you can see your iPhone location history. But make sure that location services are already enabled before proceeding to the above procedure.
How to check the location history on the iPhone for someone else?
If you want to check the location history for someone else, then you can use the TrackMobi tool for reliable results. You need to follow the simple below-mentioned steps:
Step 1. Open your web browser and go to TrackMobi’s official website.
Step 2. Enter the phone number for whom you want to search for location history.
Step 3. Enter the Email address or you will be asked to pay just $0.89 to get full details.
Step 4. Log in to your TrackMobi account to get location history details on your iPhone.


